If you came here from my post on Android.Appstorm then you already know how to make a time-lapse video and you already have your files from Tina Time-lapse.
I won’t go into the details about shooting it and such. You can find all the details here.
Shall we start?
Step 1: Launch Windows Live Movie Maker
This step is pretty much self explanatory. Just launch Windows Live Movie Maker.
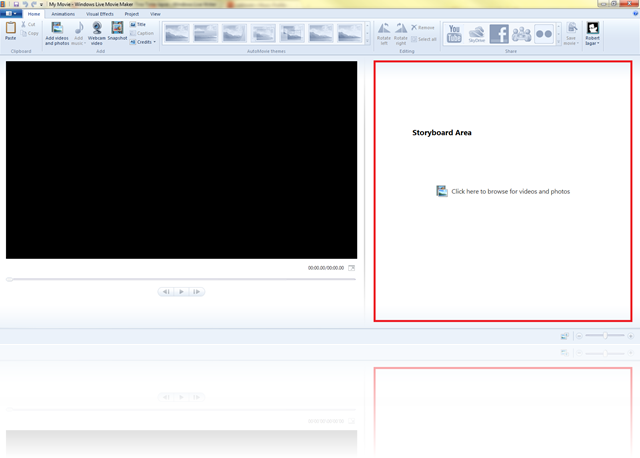
Step 2: Adding your files
In Windows Movie Maker you an area called the Storyboard Area (at least that’s what I think it’s called). Either way click where it says and select all of your photos from the Tina Time-lapse folder with the name of your time-lapse. Movie Maker should’ve imported in proper name sequence. If not delete, them and insert them the following way:
- Select the first image in your sequence
- Then while holding shift select the last image in your sequence
Now all your images should be in the proper order
Step 3: Setting the duration for each image
This is the most important job we have to do. Select all of your images in the storyboard area (just select one then press Ctrl+A) and then go to the Edit tab of your Video tools.
The duration part is where you set how long every image is shown. If you want a 25 fps clip then you divide a second by 25 and you get the duration. For example a 1/25=0.04 or 1/30=0.3 for a 30 fps clip.
Be sure to check how your footage is played back. If you frames are skipped on the image is jaggy, then you might want increase your fps, therefore reduce the duration. The problem is that WLMM only can do only a minimum of 0.03.
If you have it set-up to 0.03 you might want to close some background application as the application tends to use a lot of ram when you set things to be this fast. You might also be prompted by Windows to close the application, due to its high memory usage.
Step 4: Exporting a movie
Once you’re happy with your end result you can publish your movie straight to YouTube, Facebook, Flickr, Windows Live Groups and SkyDrive. Don’t want to publish yet? You can save it on your computer.
But first we need to create a custom setting. Here’s how you do it:
Step 4.1: Creating a custom setting
Go to the Movie Maker button and select Create a custom setting from the Save Movie menu. Depending on which frame rate you want (25,30,24) and the dimension of your photos (they should be either 720p or 1080p, making a time-lapse video with a smaller resolution than that is pointless in my opinion) make the following settings:
- Name: Whatever you want (generally you want to specify the details of the preset, 720p @30fps or 1080p @25fps)
- Width: 1980/1280 (or what width your photos are)
- Height: 1080/720 (again, this depends on what you have)
- Bitrate: This should be as high as possible for good playback. If this is too low, you may end up with a grainy video, if this is too high, you may end with a too huge of a file. I think this should be roughly at 25.000 kbps or 30.000 kbps
- Frame rate: This should be the same as the frame rate you want. Just divide 1 by the duration you set and you should get your frame rate.
- Audio: If you have audio, I recommend 256 kbps, 44.1 kHz, stereo.
Hit save.
Step 4.1: Exporting using your custom setting
Now select your preset from your Save movie menu, select where to save and you should get a pretty nice time-lapse video in the end. If not, you can leave me a comment or email me [email protected] and I’ll try and help how I can.
Conclusion
Hope you enjoyed this post.
Below you’ll find a video from my YouTube channel showing some of my time-lapse video tests with their respected settings in the app.
Until next time!

